Insight Assessment Platform
1. Why did the Digital Assessment Library (DAL) move into Insight?
To provide a single portal to access DAL and Insight tests and results, providing a more consistent experience reducing administration overheads for teachers.
2. Am I able to access DAL results in Insight from previous years?
Yes, DAL historical data has also been added for previous years to the Insight Platform. You can see this data by changing the roster filters and tagging previous years in the reporting section of the platform.
3. Is there any change in the way I use Insight including access assessments and results?
No, the basic processes are the same but some new functions will help in finding the correct assessments and reports.
4. Can I still use the previous method for delivering RVEAL tests?
Yes, we encourage you to set up students with login details for the student page to increase the security around student access but the previous approaches in test assignment still operates as they did in the past.
5. How do I get my login for Insight?
Government Schools
Insight uses CASES21 data to support logging in. If your information is missing or incorrect in CASES21, you may receive an error message when logging in.
Please check with your CASES21 operator that your name, User ID and home group are correct in CASES21.
For further assistance, refer to the platform support page for government schools.
Melbourne Archdiocese Catholic Schools and Diocese of Sale Catholic Schools
Insight uses C number credentials to support logging in. If your information is missing or incorrect, you may receive an error message when logging in.
For further assistance, refer to the platform support page for non-government schools.
Independent and other Catholic
Your school's principal or Insight school administrator is required to provide staff and student data files each year to enable staff to log into the Platform.
For further assistance, refer to the platform support page for non-government schools.
6. Do I have to create an assignment code for each student?
No – you do not need to create an assignment code for each student. You can assign an entire class, or a selection of students within a class, to a single assignment code at the time of creation.
You also do not need to create a new test code each day or each time you log in – please use the ‘Manage Test Codes’ screen to find existing assignment codes (See ‘Question 9. How can I find an existing test code?’).
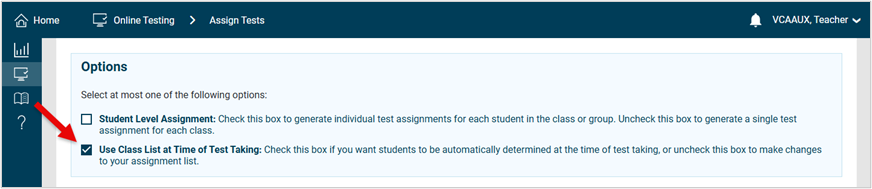
7. How do I assign an assessment to a whole class?
When assigning an assessment in the ‘Assign Tests’ screen, all students within a class will be selected – highlighted in blue – by default. Click ‘Assign’ to generate an assignment code for the class.
You may also tick the option ‘Use Class List at Time of Test Taking’ to ensure that when a new student is added to the existing class, Insight will automatically add that student into the assignment code.

8. How do I assign an assessment to specific students?
After selecting a class, all students will be selected – highlighted in blue – by default. If you wish that only specific students in a class are to undertake the assessment, you may deselect students by clicking on their names. Deselected students will be shown in grey and will not be included in the assignment code.

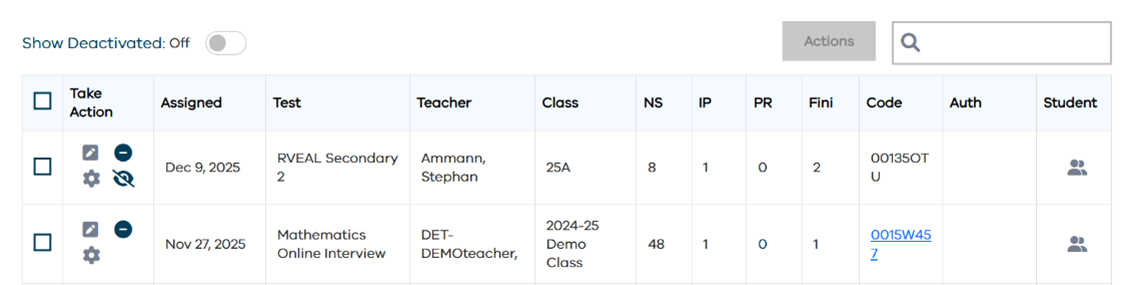
9. How can I find an existing test code?
When you first assign an assessment in the ‘Assign Tests’ screen, the assignment code will appear in the table at the bottom of the page.
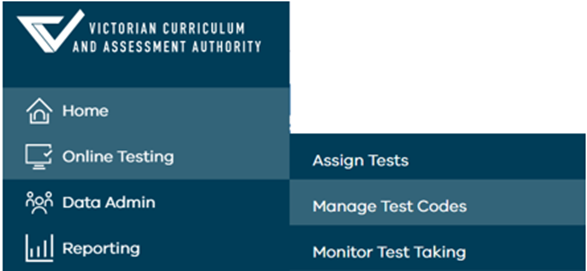
To find the test codes again, click on Online Testing then Manage Test codes.
Then select the correct time frame from when the test code was made and click ‘Apply’.
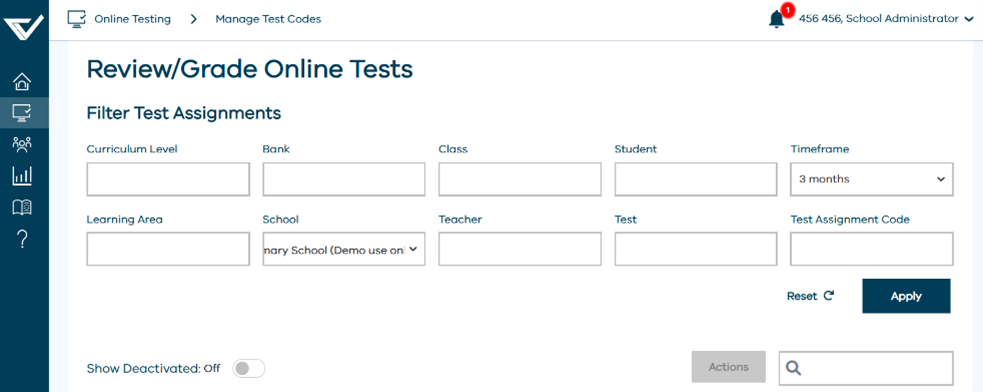
Then you will see the list of assessment codes, as below<
If your previous assignment codes do not appear in the table on the ‘Manage Test Codes’ screen, please ensure that the ‘Timeframe’ filter has been adjusted accordingly and click ‘Apply Filters’.
10. How can I review an assessment that is ‘In Progress’?
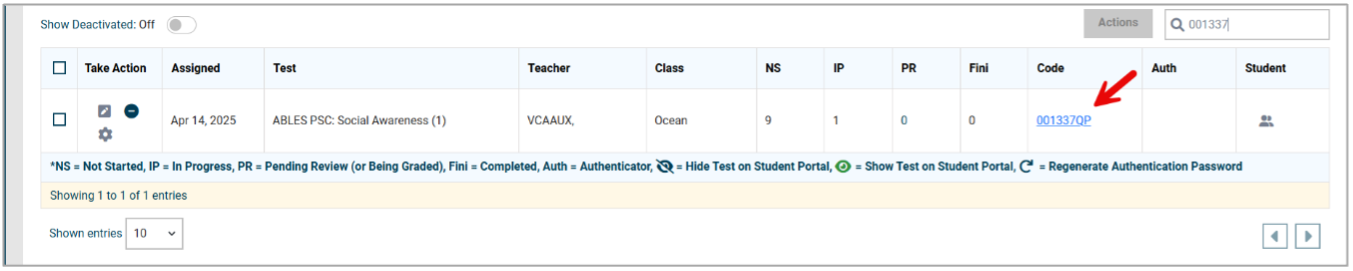
To view the progress of assessments, go the ‘Manage Test Codes’ screen and scroll down to the table of existing assignment codes. Ensure that you have the ‘Timeframe’ filter set appropriately to view past assignment codes.
From here, you can view each assignment code and associated student information, including how many students who have Not Started (NS), how many are In Progress (IP), how many are Pending Review (PR) and how many have been Submitted (Fini).
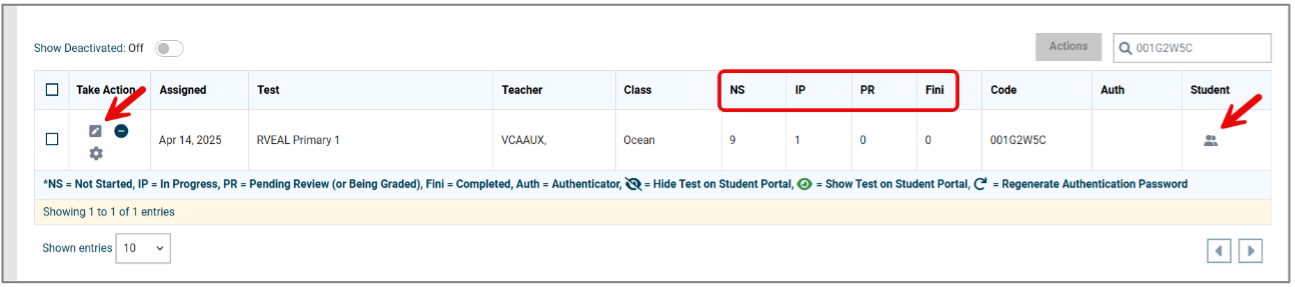
Hovering over the ‘Students’ icon will show a list of the students assigned to that assessment. Selecting the ‘Review’ icon will show you students' assessment responses.
11. Can I manually enter an assignment code into the Test Taker?
Yes – if you have recorded or written down an assignment code, you may go to the ‘Test Taker’ URL (https://test.linkitau.com/) and enter the code to launch the assessment for a student.
12. How do I resume a paused assessment?
You may resume a paused assessment by finding a past assignment code in the ‘Manage Test Codes’ screen and clicking on the blue hyperlink, or by going to the Test Taker URL (https://test.linkitau.com/) and entering the assignment code.
Please do not create another test code if you have paused a student's assessment. Please reuse the existing assignment code as shown above.
13. Who is the Insight school administrator at my school?
By default, your school's principal is automatically given Insight school administrator permissions, but a school may have more than one school administrator.
If your school would like to have staff added or removed as school administrators, please contact your school principal or one of the following support teams:
For government schools, refer to the platform support page for government schools.
For all other schools, refer to the platform support page for non-government schools.
14. I am a school principal or school administrator. How do I remove an Insight user?
If a user is no longer working at your school, it is necessary to remove them from Insight in a timely manner to ensure that they no longer have access to secure and/or private student data.
Removing left staff also ensures that they no longer receive communications from Insight, including TLDS notifications.
Government, ICON and Sale schools
The user will need to be removed from your school’s data management system (CASES21, ICON/eSIS). Changes made in these systems will flow directly to Insight.
Independent and Catholic NON-ICON schools
Please inform the VCAA Insight Helpdesk (insight@education.vic.gov.au) of any users that will need to be removed.
15. What do I do if a student is missing on Insight?
Government schools
Ensure your school’s CASES21 data is up to date. Changes made in CASES21 will roll over to Insight by the following day.
For further assistance, refer to the platform support page for government schools.
Melbourne Archdiocese Catholic Schools and Diocese of Sale Catholic Schools
Ensure the data in your student management system is up to date. Changes made in your system will roll over to Insight by the following day.
For further assistance, refer to the platform support page for non-government schools.
Independent and other Catholic schools
Student data is typically provided to the VCAA each year via an excel data file.
For further assistance, refer to the platform support page for non-government schools.
16. I co-teach a class with another teacher. Can we both see our students’ data on Insight?
If you co-teach a class with another teacher, you might not immediately see the students you teach on the Insight platform, as you may not be attached to the class as the primary teacher in your school’s management system (e.g. CASES21, ICON).
In this instance, you may ask your Insight school administrator to assign you as a co-teacher for your class. This will mean that both you and your teaching partner may assign assessments and view data and reporting for the class in question. Please note that the steps for creating a co-teacher are outlined in the School Administrator User Guide.
Alternatively, if you would like a colleague at your school to support you to undertake some of your assessments with your students but not access reporting, you may simply provide them with the assignment code and instruct them to go to the Test Taker (https://test.linkitau.com) to run the assessment.
17. How do I create an ad hoc group in Insight?
You may wish to create a grouping of students across different homerooms or year levels – also known as an ad hoc group. For example, your school may wish to create a group containing EAL students from various year levels who will undertake the RVEAL assessments.
An Insight school administrator will be able to create an ad hoc group on the Insight Platform by following the steps outlined in the School Administrator User Guide.
18. I can’t see my students’ response data on the Reporting Dashboard. What should I do?
If you cannot see the student reporting data you were expecting to see on the Insight Platform, please try adjusting the time period filter in the Dashboard Explorer.
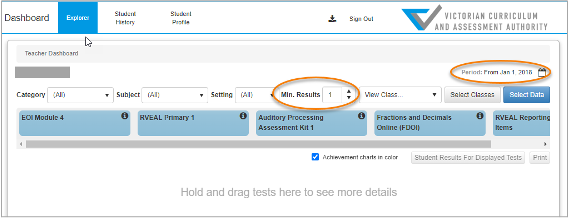
To adjust the time period filter:
- Click on the Calendar icon
- Use the back and forward arrows to select the ‘Beginning’ and ‘End’ of the time period. If you leave the ‘Any date’ checkbox ticked, the end date will continually shift to the current date.
- Tick ‘Use this start date in future sessions’ if you would like the ‘Beginning’ date for the time period to remain static.
- Click ‘OK’.
Another reason for student response data not showing up might be that the ‘Minimum Results’ field has not been set to 1. Setting the ‘Minimum Results’ field to 1 would ensure that even if only one student has undertaken the assessment, the blue assessment rectangle will appear and associated data and reporting will be visible.
Please note that ABLES assessments that have not been submitted will not appear in the Explore Dashboard, and DATE assessments do not appear in the Student History Dashboard.
19. How can I update my staff, student and class information on Insight?
- Government, MACS or SALE diocese schools: your school’s staff and student class information is managed through an automatic update every night drawn from data in your school administrative system. No manual action is required; if the data is incorrect, please contact your school administrator for assistance.
- Independent and other Catholic schools must submit staff and student information regularly using a secure upload which is managed by the VCAA. Updates are recommended at the start of each year and when staff or student details change throughout the year. School administrators should refer to the School Administrator User Guide.
20. Can interstate schools access Insight?
The platform is only available to schools that are registered and located within the state of Victoria.