Student objective: To complete the obstacle course as fast as possible
Time: Approximately 60 seconds per student
Space, equipment and preparation:
- 2 × benches or low beams (each 360cm long × 27cm wide × 30cm high)
- 6 × ribbons or drop-down lines
- 4 × hoops (70cm diameter)
- 5 × cones or multi-sport posts
- a foam vault (63cm high)
- a safety mat (each 150cm long × 100cm wide × 5cm high)
- 11 × cones to denote the start and end of each area
- a stopwatch
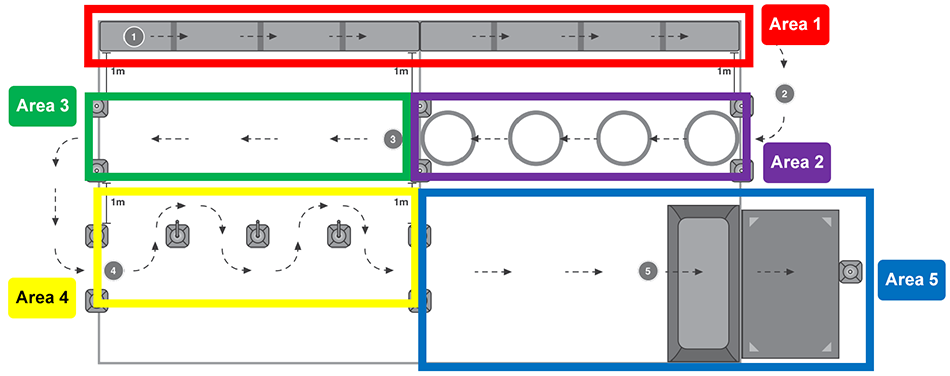
Area 1Place 2 benches or low beams end-to-end with 3 ribbons or drop-down lines evenly spaced out along each bench/beam (6 ribbons or drop-down lines in total).
Area 2Place 2 cones on the floor, in line with the end of the bench/beam, with the closest cone 1m away. Place 4 70cm hoops in a line parallel to the bench/beam with a 25cm gap between each hoop. Place 2 cones at the end of the last hoop, in line with where the benches/beams meet.
Area 3Place 2 cones 360cm beyond the end of the hoops, in line with the starting position on the first bench/beam.
Area 4Place 2 cones to signal the start of a new section. Place either 5 cones or multi-sport posts 90cm apart for the students to slalom through. The first post should be in line with the bench/beam starting position, but 1m away from the cone signalling the end of area 3. Use 2 cones to signal the end of this section, in line with where the 2 benches/beams meet.
Area 5Place the foam vault so that the end is in line with the end of the bench/beam and the start of the jump section. Place a mat after the vault and a cone after the mat to signal the end of the course.
Procedure and instructions:
- Walking (Balancing forwards): The student starts on the end of the first bench/beam. The teacher gives the starting signal and starts the stopwatch. The students walks forward along the bench/beam and touches each ribbon/drop down line with one hand as they go.
- Traveling jumps (Walking forwards through the hoops): The student steps into each hoop as they move forward. The order in which the feet are placed and the number of feet in the hoops at any time are not important.
- Alligator crawl (Crawling forwards on all 4 limbs): The student crawls forward on all 4 limbs with the face pointing forwards and the belly facing the ground. The students starts in position with both hands before the line of the 2 cones and may only stand up when both hands pass the line of the cones at the end of the area.
- Slaloming (Walking forwards): The student slaloms forwards between the poles or cones.
- Clambering (Climbing over the vault): The student climbs over the foam vault, lands on the mat and touches the cone at the end of the course.
- The teacher stops the stopwatch once the student has touched the cone
Observation position: Either video each student or observe ensure you can observe them performing each section of the course correctly and safely.
Digital resources:
 Athletic Skills Track scorecard
Athletics Skills Track 1 assessment procedure video